In order to help UniMAT customers use IoT products more conveniently, a series of articles on IoT application courses are specially launched. The articles will comprehensively introduce the software and hardware, operation methods, related configurations, typical applications, common problems and other knowledge of UniMAT IoT. After reading the full text, you can have a comprehensive understanding of the Internet of Things, and achieve more with less for the application of the Internet of Things.
This issue brings you the alarm settings and push of Edimensional IoT .
1. Alarm push
Process: software → user registration → application for second-level domain name → add device → alarm data

02Push route setting
In Anyaccess, Basic Settings > Message Push Configuration.
Push channels include: SMS, APP, WeChat, phone push, email push. Among them, SMS and phone calls need to be recharged, and the recharge method is: Anyaccess configuration recharge.


03 Add pusher
In Anyaccess, add in Basic Settings > Message Contacts

04 WeChat push: pay attention to the public account
The person being pushed needs to follow the public account on WeChat
2. IoT touch screen alarm, import and export of historical data configuration
Principle: Alarms and historical data need to be configured in the cloud, and the cloud shall prevail. After the cloud configuration, it will be delivered to the local.
For ordinary touch screen, when the configuration project that has been configured with alarm and historical data and other information is converted into an IoT touch screen, pay attention to: the alarm configured in the touch screen Uniface is exported, and then imported to the cloud. When the cloud device goes online, the configuration is delivered to the local through the cloud.
01 Export the file in JSON format

02Import files in JSON format
On the device management platform, select the device in Anyaccess, right-click, and configure and upload the exported JSON file .

03 Issue
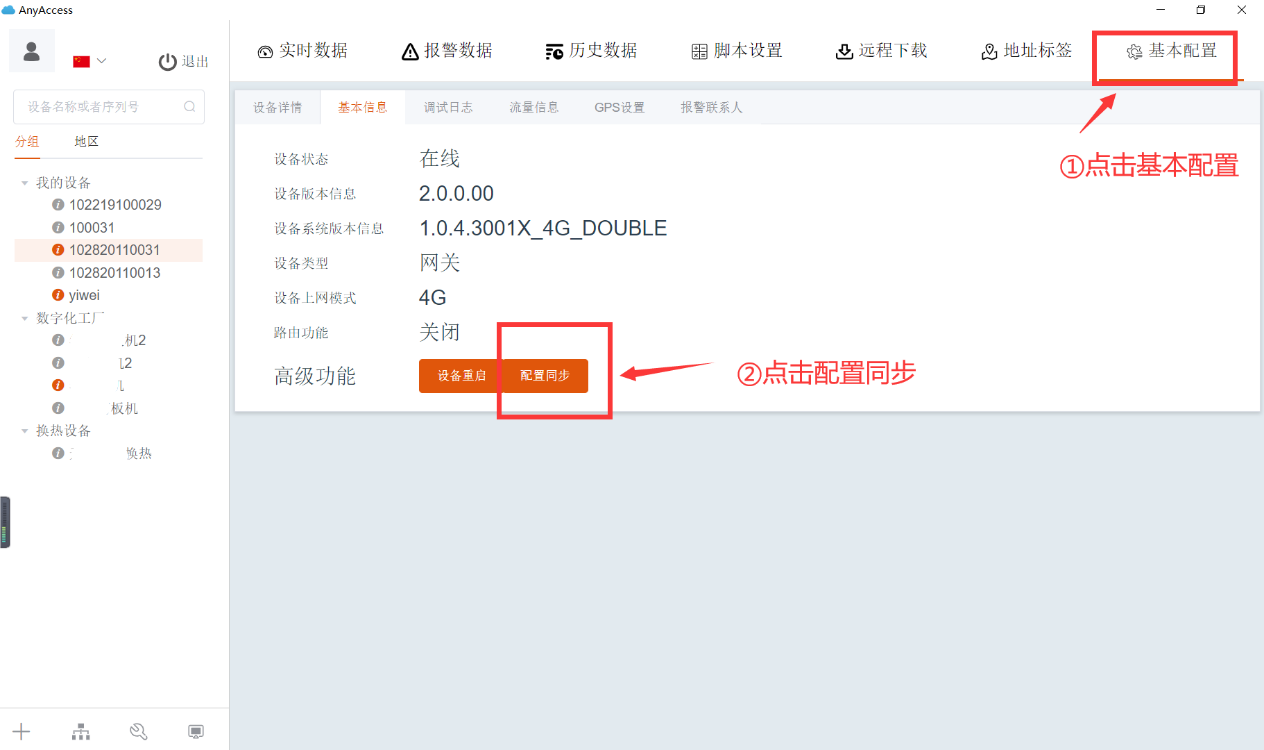
After the device is online, click Query, and the relevant configuration will be automatically delivered to the cloud and local.
If the delivery is not successful, try to click Basic Configuration >> Basic Information Configuration Synchronization.
3. Gateway Anyaccess History/Alarm Instructions

02Add historical data
Historical data is used for energy consumption summary calculation and report statistics


03Sync configuration
After all the above configurations, you can upload the settings to the Ubox in the future by synchronizing. You can also wait a moment for automatic download synchronization.

04Address Label
It is convenient for multi-data situations, especially when historical and real-time data and alarm data are used.

Alarm Data Reference Settings

Historical data reference settings


![[Technical Classroom] UniMAT Internet of Things Application Course (8) - Internet of Things Alarm Settings and Push](http://www.unimatautomation.com/cdn/shop/articles/4164_700b0768-c8db-4e67-bb90-d3c57b56957c.jpg?v=1663297788&width=1600)


